基于javaboy的springboot快速练习,内容包括springboot静态资源配置,自定义starter,异常处理,持久层的整合,nosql的整合,thymeleaf的整合,邮件的发送等内容。
springmvc配置类(包扫描,如果要配置其他继承WebMvcConfigurationSupport)
 1
 2
 3
 4
 5
 6
 7
 8
 9
10
11
12
13
14
15
16
17
18
19
20
21
22
23
24
25
26
27
28
@Configuration
@ComponentScan ( basePackages = "top.dengwq" )
public class SpringMvcConfig extends WebMvcConfigurationSupport {
@Override
protected void addResourceHandlers ( ResourceHandlerRegistry registry ) {
registry . addResourceHandler ( "/js/**" ). addResourceLocations ( "/" );
}
@Override
protected void configureViewResolvers ( ViewResolverRegistry registry ) {
registry . jsp ( "/jsp/" , ".jsp" );
}
@Override
protected void addViewControllers ( ViewControllerRegistry registry ) {
registry . addViewController ( "go" ). setViewName ( "go" );
}
@Override
protected void configureMessageConverters ( List < HttpMessageConverter <?>> converters ) {
FastJsonHttpMessageConverter converter = new FastJsonHttpMessageConverter ();
converter . setDefaultCharset ( Charset . forName ( "UTF-8" ));
FastJsonConfig fastJsonConfig = new FastJsonConfig ();
fastJsonConfig . setCharset ( Charset . forName ( "UTF-8" ));
converter . setFastJsonConfig ( fastJsonConfig );
converters . add ( converter );
}
}
WebInit继承WebApplicationInitializer实现onstartup(注册mvc配置类,添加DispatchServlet)
 1
 2
 3
 4
 5
 6
 7
 8
 9
10
public class WebInit implements WebApplicationInitializer {
@Override
public void onStartup ( ServletContext servletContext ) throws ServletException {
AnnotationConfigWebApplicationContext ctx = new AnnotationConfigWebApplicationContext ();
ctx . register ( SpringMvcConfig . class );
ServletRegistration . Dynamic springmvc = servletContext . addServlet ( "springmvc" , new DispatcherServlet ( ctx ));
springmvc . addMapping ( "/" );
springmvc . setLoadOnStartup ( 1 );
}
}
在 Spring Boot 中,配置文件有两种不同的格式,一个是 properties ,另一个是 yaml 。
除了简洁,yaml 还有另外一个特点,就是 yaml 中的数据是有序的,properties 中的数据是无序的,在一些需要路径匹配的配置中,顺序就显得尤为重要(例如我们在 Spring Cloud Zuul 中的配置),此时我们一般采用 yaml。
在 Spring Boot 中,一共有 4 个地方可以存放 application.properties 文件。
当前项目根目录下的 config 目录下 当前项目的根目录下 resources 目录下的 config 目录下 resources 目录下 PS:可以通过 spring.config.location 属性来手动的指定配置文件位置。
自定义配置文件名,可以通过 “spring.config.name ” 这个属性来修改。
 1
 2
 3
 4
 5
 6
 7
 8
 9
10
11
@Component // 这个bean必须由spring管理
@PropertySource ( "classpath:book.properties" )
public class Book {
@Value ( "${book.id}" )
private Long id ;
@Value ( "${book.name}" )
private String name ;
@Value ( "${book.author}" )
private String author ;
//getter/setter
}
1
2
3
4
5
6
7
8
9
@Component
@PropertySource ( "classpath:book.properties" )
@ConfigurationProperties ( prefix = "book" )
public class Book {
private Long id ;
private String name ;
private String author ;
//省略getter/setter
}
在resources 目录下创建一个名为 META-INF 的文件夹,然后在文件夹中创建一个名为 spring.factories 的文件,文件内容如下:
1
org.springframework.boot.autoconfigure.EnableAutoConfiguration = org.javaboy.mystarter.HelloServiceAutoConfiguration
在这里指定我们的自动化配置类的路径即可。
 1
 2
 3
 4
 5
 6
 7
 8
 9
10
11
12
13
14
15
16
17
18
19
20
21
22
23
24
25
26
27
28
29
30
31
32
33
34
35
36
37
38
39
40
41
42
43
// 接口
public interface Food {
String showName ();
}
-----------------------------------------------------------------
// 实现类
public class Rice implements Food {
public String showName () {
return "米饭" ;
}
}
public class Noodles implements Food {
public String showName () {
return "面条" ;
}
}
-----------------------------------------------------------------
// 条件类
public class NoodlesCondition implements Condition {
public boolean matches ( ConditionContext context , AnnotatedTypeMetadata metadata ) {
return context . getEnvironment (). getProperty ( "people" ). equals ( "北方人" );
}
}
public class RiceCondition implements Condition {
public boolean matches ( ConditionContext context , AnnotatedTypeMetadata metadata ) {
return context . getEnvironment (). getProperty ( "people" ). equals ( "南方人" );
}
}
-----------------------------------------------------------------
// 配置类
@Configuration
public class JavaConfig {
@Bean ( "food" )
@Conditional ( RiceCondition . class )
Food rice () {
return new Rice ();
}
@Bean ( "food" )
@Conditional ( NoodlesCondition . class )
Food noodles () {
return new Noodles ();
}
}
 1
 2
 3
 4
 5
 6
 7
 8
 9
10
11
12
13
14
15
16
17
18
19
20
21
22
23
24
25
// 注解
@Target ({ ElementType . TYPE , ElementType . METHOD })
@Retention ( RetentionPolicy . RUNTIME )
@Documented
@Conditional ( ProfileCondition . class )
public @interface Profile {
String [] value ();
}
----------------------------------------------------------
// 条件类
class ProfileCondition implements Condition {
@Override
public boolean matches ( ConditionContext context , AnnotatedTypeMetadata metadata ) {
MultiValueMap < String , Object > attrs = metadata . getAllAnnotationAttributes ( Profile . class . getName ());
if ( attrs != null ) {
for ( Object value : attrs . get ( "value" )) {
if ( context . getEnvironment (). acceptsProfiles ( Profiles . of (( String [] ) value ))) {
return true ;
}
}
return false ;
}
return true ;
}
}
虽然现在慢慢在流行前后端分离开发,但是据松哥所了解到的,还是有一些公司在做前后端不分的开发,而在前后端不分的开发中,我们就会需要后端页面模板(实际上,即使前后端分离,也会在一些场景下需要使用页面模板,例如邮件发送模板)。
 1
 2
 3
 4
 5
 6
 7
 8
 9
10
11
12
13
14
15
16
17
18
19
20
21
22
23
24
@Controller
public class IndexController {
@GetMapping ( "index" )
public String index ( Model model ) {
List < User > users = new ArrayList <> ();
for ( int i = 0 ; i < 10 ; i ++ ) {
User u = new User ();
u . setId (( long ) i );
u . setName ( "dengwq:" + i );
u . setAddress ( "上海:" + i );
users . add ( u );
}
model . addAttribute ( "users" , users );
return "index" ;
}
}
---------------------------------------
public class User {
private Long id ;
private String name ;
private String address ;
// get set 方法
}
thymeleaf页面
 1
 2
 3
 4
 5
 6
 7
 8
 9
10
11
12
13
< html lang = "en" xmlns:th = "http://www.thymeleaf.org" >
< table border = "1" >
< tr >
< td > 编号</ td >
< td > 用户名</ td >
< td > 地址</ td >
</ tr >
< tr th:each = "user : ${users}" >
< td th:text = "${user.getId()}" ></ td >
< td th:text = "${user.getName()}" ></ td >
< td th:text = "${user.getAddress()}" ></ td >
</ tr >
</ table >
 1
 2
 3
 4
 5
 6
 7
 8
 9
10
11
@Autowired
TemplateEngine templateEngine ;
@Test
public void test1 () throws MessagingException {
Context context = new Context ();
context . setVariable ( "username" , "javaboy" );
context . setVariable ( "position" , "Java工程师" );
context . setVariable ( "salary" , 99999 );
String mail = templateEngine . process ( "mail" , context );
//省略邮件发送
}
thymeleaf页面
 1
 2
 3
 4
 5
 6
 7
 8
 9
10
11
12
13
14
15
16
17
18
19
20
21
<!DOCTYPE html>
< html lang = "en" xmlns:th = "http://www.thymeleaf.org" >
< head >
< meta charset = "UTF-8" >
< title > Title</ title >
</ head >
< body >
< p > hello 欢迎 < span th:text = "${username}" ></ span > 加入 XXX 集团,您的入职信息如下:</ p >
< table border = "1" >
< tr >
< td > 职位</ td >
< td th:text = "${position}" ></ td >
</ tr >
< tr >
< td > 薪水</ td >
< td th:text = "${salary}" ></ td >
</ tr >
</ table >
< img src = "http://www.javaboy.org/images/sb/javaboy.jpg" alt = "" >
</ body >
</ html >
渲染时,我们需要首先注入一个 TemplateEngine 对象,这个对象就是在 Thymeleaf 的自动化配置类中配置的(即当我们引入 Thymeleaf 的依赖之后,这个实例就有了)。 然后构造一个 Context 对象用来存放变量。 调用 process 方法进行渲染,该方法的返回值就是渲染后的 HTML 字符串,然后我们将这个字符串发送出去。 在 Spring Boot 中,如果我们是从 https://start.spring.io 这个网站上创建的项目,或者使用 IntelliJ IDEA 中的 Spring Boot 初始化工具创建的项目,默认都会存在 resources/static 目录,静态资源只要放到这个目录下,就可以直接访问,除了这里还有没有其他可以放静态资源的位置呢?
默认情况下,一共有五个位置可以放静态资源,这五个路径分别是:
classpath:/META-INF/resources/ classpath:/resources/ classpath:/static/ classpath:/public/ /(如果由webapp就是webapp根目录) 1
2
3
4
5
6
7
@Configuration
public class WebMVCConfig implements WebMvcConfigurer {
@Override
public void addResourceHandlers ( ResourceHandlerRegistry registry ) {
registry . addResourceHandler ( "/**" ). addResourceLocations ( "classpath:/aaa/" );
}
}
使用这个 Controller ,可以实现三个方面的功能:
全局异常处理 全局数据绑定 全局数据预处理 1
2
3
4
5
6
7
8
9
10
@ControllerAdvice
public class MyGlobalExceptionHandler {
@ExceptionHandler ( Exception . class )
public ModelAndView customException ( Exception e ) {
ModelAndView mv = new ModelAndView ();
mv . addObject ( "message" , e . getMessage ());
mv . setViewName ( "myerror" );
return mv ;
}
}
在该类中,可以定义多个方法,不同的方法处理不同的异常,例如专门处理空指针的方法、专门处理数组越界的方法…,也可以直接向上面代码一样,在一个方法中处理所有的异常信息。
@ExceptionHandler 注解用来指明异常的处理类型,即如果这里指定为 NullpointerException,则数组越界异常就不会进到这个方法中来。
1
2
3
4
5
6
7
8
9
10
11
12
13
14
15
16
17
18
19
20
21
@ControllerAdvice
public class MyGlobalExceptionHandler {
@ModelAttribute ( name = "md" )
public Map < String , Object > mydata () {
HashMap < String , Object > map = new HashMap <> ();
map . put ( "age" , 99 );
map . put ( "gender" , "男" );
return map ;
}
}
---------------------------------------------------------
@RestController
public class HelloController {
@GetMapping ( "/hello" )
public String hello ( Model model ) {
Map < String , Object > map = model . asMap ();
System . out . println ( map );
int i = 1 / 0 ;
return "hello controller advice" ;
}
}
传统的跨域方案是JSONP,JSONP虽然能解决跨域但是有一个很大的局限性,那就是只支持GET请求,不支持其他类型的请求,而今天我们说的CORS(跨域源资源共享)(CORS,Cross-origin resource sharing)是一个W3C标准,它是一份浏览器技术的规范,提供了Web服务从不同网域传来沙盒脚本的方法,以避开浏览器的同源策略,这是JSONP模式的现代版。
provider
 1
 2
 3
 4
 5
 6
 7
 8
 9
10
11
12
13
14
15
16
17
18
19
20
21
22
23
24
25
26
27
28
29
30
31
@RestController
public class HelloController {
@CrossOrigin ( value = "http://localhost:8081" ) //解决单个方法跨域
@GetMapping ( "/hello" )
public String hello () {
return "get hello" ;
}
// @CrossOrigin(value = "http://localhost:8081")
@PostMapping ( "/hello" )
public String hello2 () {
return "post hello" ;
}
}
---------------------------------------------------------------------
// 解决全局跨域
@Configuration
public class WebMvcConfiguration extends WebMvcConfigurationSupport {
@Override
protected void addCorsMappings ( CorsRegistry registry ) {
// /**表示本应用的所有方法都会去处理跨域请求
// allowedMethods表示允许通过的请求数
// allowedHeaders则表示允许的请求头
registry . addMapping ( "/**" )
. allowedOrigins ( "http://localhost:8081" )
. allowedMethods ( "*" )
. allowedHeaders ( "*" );
}
}
consumer
1
2
3
4
5
6
7
8
9
10
11
12
13
14
15
16
17
18
< div id = "app" ></ div >
< input type = "button" onclick = "btnClick()" value = "get_button" >
< input type = "button" onclick = "btnClick2()" value = "post_button" >
< script src = "https://code.jquery.com/jquery-3.1.1.min.js" ></ script >
< script >
function btnClick () {
$ . get ( 'http://localhost:8080/hello' , function ( msg ) {
$ ( "#app" ). html ( msg );
});
}
function btnClick2 () {
$ . post ( 'http://localhost:8080/hello' , function ( msg ) {
$ ( "#app" ). html ( msg );
});
}
</ script >
了解了整个CORS的工作过程之后,我们通过Ajax发送跨域请求,虽然用户体验提高了,但是也有潜在的威胁存在,常见的就是CSRF(Cross-site request forgery)跨站请求伪造。
基于此,浏览器在实际操作中,会对请求进行分类,分为简单请求,预先请求,带凭证的请求等,预先请求会首先发送一个options探测请求,和浏览器进行协商是否接受请求。默认情况下跨域请求是不需要凭证的,但是服务端可以配置要求客户端提供凭证,这样就可以有效避免csrf攻击。
在 Servlet/Jsp 项目中,如果涉及到系统任务,例如在项目启动阶段要做一些数据初始化操作,这些操作有一个共同的特点,只在项目启动时进行,以后都不再执行,这里,容易想到web基础中的三大组件( Servlet、Filter、Listener )之一 Listener ,这种情况下,一般定义一个 ServletContextListener,然后就可以监听到项目启动和销毁,进而做出相应的数据初始化和销毁操作,例如下面这样:
1
2
3
4
5
6
7
8
9
10
public class MyListener implements ServletContextListener {
@Override
public void contextInitialized ( ServletContextEvent sce ) {
//在这里做数据初始化操作
}
@Override
public void contextDestroyed ( ServletContextEvent sce ) {
//在这里做数据备份操作
}
}
当然,这是基础 web 项目的解决方案,如果使用了 Spring Boot,那么我们可以使用更为简便的方式。Spring Boot 中针对系统启动任务提供了两种解决方案,分别是 CommandLineRunner 和 ApplicationRunner,分别来看。
1
2
3
4
5
6
7
@Component
@Order ( 100 )
public class MyCommandLineRunner1 implements CommandLineRunner {
@Override
public void run ( String ... args ) throws Exception {
}
}
首先通过 @Compoent 注解将 MyCommandLineRunner1 注册为Spring容器中的一个 Bean。 添加 @Order注解,表示这个启动任务的执行优先级,因为在一个项目中,启动任务可能有多个,所以需要有一个排序。@Order 注解中,数字越小,优先级越大,默认情况下,优先级的值为 Integer.MAX_VALUE,表示优先级最低。 在 run 方法中,写启动任务的核心逻辑,当项目启动时,run方法会被自动执行。 run 方法的参数,来自于项目的启动参数,即项目入口类中,main方法的参数会被传到这里。 SpringMVC 相关的自动化配置是在 WebMvcAutoConfiguration 配置类中实现的,它的生效条件:
1
2
3
4
5
6
7
8
9
@Configuration
@ConditionalOnWebApplication ( type = Type . SERVLET )
@ConditionalOnClass ({ Servlet . class , DispatcherServlet . class , WebMvcConfigurer . class })
@ConditionalOnMissingBean ( WebMvcConfigurationSupport . class )
@AutoConfigureOrder ( Ordered . HIGHEST_PRECEDENCE + 10 )
@AutoConfigureAfter ({ DispatcherServletAutoConfiguration . class , TaskExecutionAutoConfiguration . class ,
ValidationAutoConfiguration . class })
public class WebMvcAutoConfiguration {
}
简单总结一下:
Spring Boot 1.x 中,自定义 SpringMVC 配置可以通过继承 WebMvcConfigurerAdapter 来实现。 Spring Boot 2.x 中,自定义 SpringMVC 配置可以通过实现 WebMvcConfigurer 接口来完成。 如果在 Spring Boot 中使用继承 WebMvcConfigurationSupport 来实现自定义 SpringMVC 配置,或者在 Spring Boot 中使用了 @EnableWebMvc 注解,都会导致 Spring Boot 中默认的 SpringMVC 自动化配置失效。 在纯 Java 配置的 SSM 环境中,如果我们要自定义 SpringMVC 配置,有两种办法,第一种就是直接继承自 WebMvcConfigurationSupport 来完成 SpringMVC 配置,还有一种方案就是实现 WebMvcConfigurer 接口来完成自定义 SpringMVC 配置,如果使用第二种方式,则需要给 SpringMVC 的配置类上额外添加 @EnableWebMvc 注解,表示启用 WebMvcConfigurationSupport,这样配置才会生效。换句话说,在纯 Java 配置的 SSM 中,如果你需要自定义 SpringMVC 配置,你离不开 WebMvcConfigurationSupport ,所以在这种情况下建议通过继承 WebMvcConfigurationSupport 来实现自动化配置。 数据库连接池druid
1
2
3
4
spring.datasource.type = com.alibaba.druid.pool.DruidDataSource
spring.datasource.username = root
spring.datasource.password = 123
spring.datasource.url = jdbc:mysql:///test01?useUnicode=true&characterEncoding=UTF-8
JdbcTemplate中,除了查询有几个API之外,增删改统一都使用update来操作,自己来传入SQL即可。例如添加数据。
增删改api
1
2
3
public int addUser ( User user ) {
return jdbcTemplate . update ( "insert into user (username,address) values (?,?);" , user . getUsername (), user . getAddress ());
}
查询api
1
2
3
public List < User > getAllUsers2 () {
return jdbcTemplate . query ( "select * from user" , new BeanPropertyRowMapper <> ( User . class ));
}
数据源配置
1
2
3
4
5
6
7
8
9
spring.datasource.one.url = jdbc:mysql:///test01?useUnicode=true&characterEncoding=utf-8&serverTimezone=GMT%2B8&useSSL=false
spring.datasource.one.username = root
spring.datasource.one.password = 123456
spring.datasource.one.type = com.alibaba.druid.pool.DruidDataSource
spring.datasource.two.url = jdbc:mysql:///test02?useUnicode=true&characterEncoding=utf-8&serverTimezone=GMT%2B8&useSSL=false
spring.datasource.two.username = root
spring.datasource.two.password = 123456
spring.datasource.two.type = com.alibaba.druid.pool.DruidDataSource
DataSourceConfig
1
2
3
4
5
6
7
8
9
10
11
@Bean
@ConfigurationProperties ( prefix = "spring.datasource.one" )
DataSource dsOne () {
return DruidDataSourceBuilder . create (). build ();
}
@Bean
@ConfigurationProperties ( prefix = "spring.datasource.two" )
DataSource dsTwo () {
return DruidDataSourceBuilder . create (). build ();
}
JdbcTemplateConfig
1
2
3
4
5
6
7
8
9
@Bean
JdbcTemplate jdbcTemplateOne ( @Qualifier ( "dsOne" ) DataSource dsOne ) {
return new JdbcTemplate ( dsOne );
}
@Bean
JdbcTemplate jdbcTemplateTwo ( @Qualifier ( "dsTwo" ) DataSource dsTwo ) {
return new JdbcTemplate ( dsTwo );
}
引入template
1
2
3
4
5
@Autowired
@Qualifier ( "jdbcTemplateOne" )
JdbcTemplate jdbcTemplateOne ;
@Resource ( name = "jdbcTemplateTwo" )
JdbcTemplate jdbcTemplateTwo ;
mapper
 1
 2
 3
 4
 5
 6
 7
 8
 9
10
11
12
13
14
15
16
17
18
19
20
21
22
23
24
25
26
@Mapper
public interface UserMapper2 {
@Select ( "select * from user" )
List < User > getAllUsers ();
@Results ({
@Result ( property = "id" , column = "id" ),
@Result ( property = "username" , column = "u" ),
@Result ( property = "address" , column = "a" )
})
@Select ( "select username as u,address as a,id as id from user where id=#{id}" )
User getUserById ( Long id );
@Select ( "select * from user where username like concat('%',#{name},'%')" )
List < User > getUsersByName ( String name );
@Insert ({ "insert into user(username,address) values(#{username},#{address})" })
@SelectKey ( statement = "select last_insert_id()" , keyProperty = "id" , before = false , resultType = Integer . class )
Integer addUser ( User user );
@Update ( "update user set username=#{username},address=#{address} where id=#{id}" )
Integer updateUserById ( User user );
@Delete ( "delete from user where id=#{id}" )
Integer deleteUserById ( Integer id );
}
这里是通过全注解的方式来写SQL,不写XML文件,@Select、@Insert、@Update以及@Delete四个注解分别对应XML中的select、insert、update以及delete标签,@Results注解类似于XML中的ResultMap映射文件(getUserById方法给查询结果的字段取别名主要是向小伙伴们演示下@Results注解的用法),另外使用@SelectKey注解可以实现主键回填的功能,即当数据插入成功后,插入成功的数据id会赋值到user对象的id属性上。
扫描注解两种方式,一种在类上加@mapper注解,一种在启动类上配置mapper目录
1
2
3
4
5
6
7
// 第一种
@Mapper
public interface UserMapper {
// 第二种
@MapperScan ( basePackages = "top.dengwq.springbootmybatis.dao" )
@SpringBootApplication
public class Application {
xml配置(xml文件放在java目录下会被maven打包忽略,需要配置maven排除忽略)
1
2
3
4
# 配置xml扫描
mybatis.mapper-locations = classpath:mapper/*Mapper.xml
# 配置包扫描自定义POJO实体类
mybatis.type-aliases-package = top.dengwq.springbootmybatis.dao
properties
1
2
3
4
5
6
7
8
9
spring.datasource.one.url = jdbc:mysql:///test01?useUnicode=true&characterEncoding=utf-8&serverTimezone=GMT%2B8&useSSL=false
spring.datasource.one.username = root
spring.datasource.one.password = 123456
spring.datasource.one.type = com.alibaba.druid.pool.DruidDataSource
spring.datasource.two.url = jdbc:mysql:///test02?useUnicode=true&characterEncoding=utf-8&serverTimezone=GMT%2B8&useSSL=false
spring.datasource.two.username = root
spring.datasource.two.password = 123456
spring.datasource.two.type = com.alibaba.druid.pool.DruidDataSource
datasource
1
2
3
4
5
6
7
8
9
10
11
12
13
14
15
16
@Configuration
public class DataSourceConfig {
@Bean
@ConfigurationProperties ( prefix = "spring.datasource.one" )
DataSource dsOne () {
return DruidDataSourceBuilder . create (). build ();
}
@Bean
@ConfigurationProperties ( prefix = "spring.datasource.two" )
DataSource dsTwo () {
return DruidDataSourceBuilder . create (). build ();
}
}
mybatis包扫描配置
 1
 2
 3
 4
 5
 6
 7
 8
 9
10
11
12
13
14
15
16
17
18
19
20
21
22
23
24
25
26
27
28
29
30
31
32
33
34
@Configuration
@MapperScan ( basePackages = "top.dengwq.mybatismoredatasource.mapper2" ,
sqlSessionFactoryRef = "sqlSessionFactory2" ,
sqlSessionTemplateRef = "sqlSessionTemplate2" )
public class MybatisConfigTwo {
@Resource ( name = "dsTwo" )
DataSource dsTwo ;
private static final String MAPPER_LOCATION = "mybatis.mapper-locations.two" ;
@Autowired
private Environment env ;
@Bean
SqlSessionFactory sqlSessionFactory2 () {
SqlSessionFactory sessionFactory = null ;
try {
SqlSessionFactoryBean bean = new SqlSessionFactoryBean ();
bean . setDataSource ( dsTwo );
// 一定要注意要重新配置MapperLocations,不然扫描不到xml
bean . setMapperLocations ( new PathMatchingResourcePatternResolver (). getResources ( env . getProperty ( MAPPER_LOCATION )));
bean . setTypeAliasesPackage ( env . getProperty ( "mybatis.type-aliases-package" ));
sessionFactory = bean . getObject ();
} catch ( Exception e ) {
e . printStackTrace ();
}
return sessionFactory ;
}
@Bean
SqlSessionTemplate sqlSessionTemplate2 () {
return new SqlSessionTemplate ( sqlSessionFactory2 ());
}
}
PS:在Mybatis配置多数据源时,自定义SqlSessionFactory,一定要将MapperLocations,TypeAliasesPackage,两个属性set进去(踩过的坑)。
properties
1
2
3
4
5
6
7
8
9
10
11
12
13
14
15
# 数据库的基本配置
spring.datasource.username = root
spring.datasource.password = root
spring.datasource.url = jdbc:mysql:///test01?useUnicode=true&characterEncoding=UTF-8
spring.datasource.type = com.alibaba.druid.pool.DruidDataSource
# JPA配置
spring.jpa.database = mysql
# 在控制台打印SQL
spring.jpa.show-sql = true
# 数据库平台
spring.jpa.database-platform = mysql
# 每次启动项目时,数据库初始化策略
spring.jpa.hibernate.ddl-auto = update
# 指定默认的存储引擎为InnoDB
spring.jpa.properties.hibernate.dialect = org.hibernate.dialect.MySQL57Dialect
pojo
1
2
3
4
5
6
7
8
9
10
@Entity ( name = "t_user" )
public class User {
@Id
@GeneratedValue ( strategy = GenerationType . IDENTITY )
private Integer id ;
@Column ( name = "name" )
private String username ;
private String address ;
//省略getter/setter
}
dao
1
2
3
4
5
6
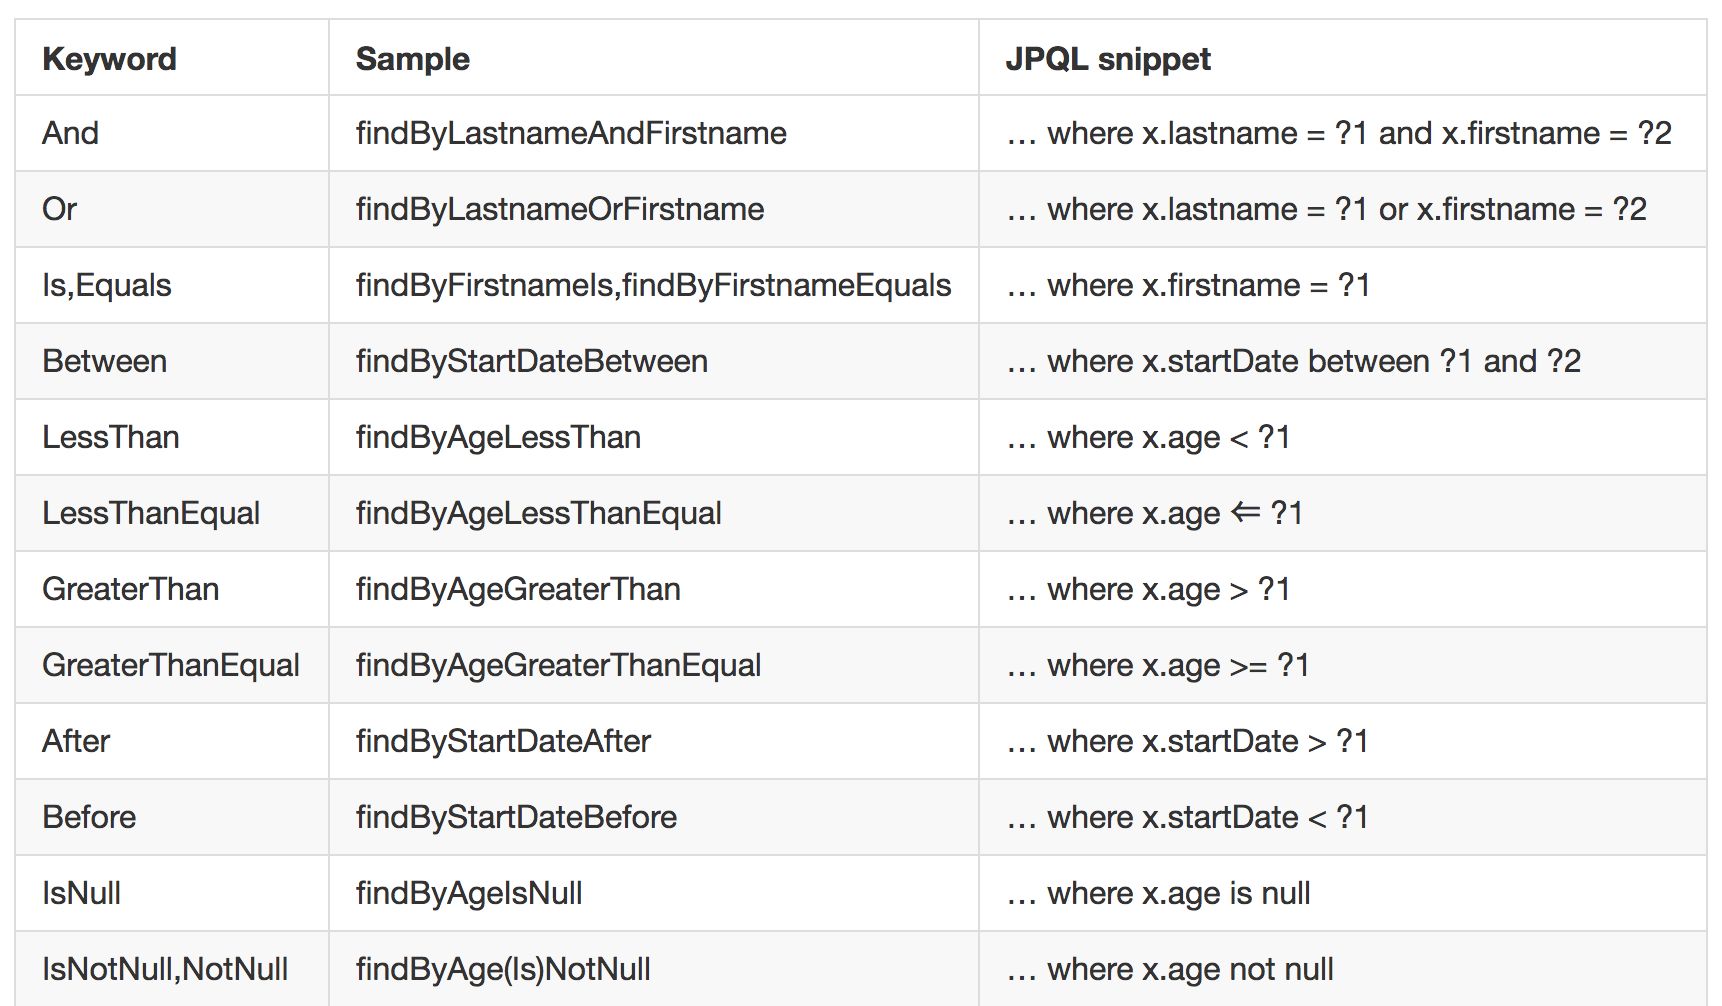
public interface UserDao extends JpaRepository < User , Integer > {
List < User > getUserByAddressEqualsAndIdLessThanEqual ( String address , Integer id );
@Query ( value = "select * from t_user where id=(select max(id) from t_user)" , nativeQuery = true )
User maxIdUser ();
}
jpa关键字参考图
 1
 2
 3
 4
 5
 6
 7
 8
 9
10
11
12
13
14
15
16
17
18
19
20
21
22
23
24
25
26
spring.cache.cache-names = c1
#要连接的数据是哪个
spring.redis.database = 1
#数据连接地址
spring.redis.host = localhost
#端口号
spring.redis.port = 6379
#连接超时时间
spring.redis.timeout = 1s
#最大连接数
spring.redis.jedis.pool.max-active = 20
#最大空闲连接
spring.redis.jedis.pool.max-idle = 20
#最小空闲连接
spring.redis.jedis.pool.min-idle = 10
#最大等待阻塞等待时间
spring.redis.jedis.pool.max-wait = -1ms
#在写入Redis时是否要使用key前缀
spring.cache.redis.use-key-prefix = true
#key前缀
spring.cache.redis.key-prefix = dev
#是否允许有null值
spring.cache.redis.cache-null-values = false
#设置缓存存在时间,只针对cacheable存入数据有用
spring.cache.redis.time-to-live = 120s
application
1
2
3
@SpringBootApplication
@EnableCaching
public class Application {
redisconfig
 1
 2
 3
 4
 5
 6
 7
 8
 9
10
11
12
13
14
15
16
17
18
19
20
21
22
23
24
25
26
27
28
29
30
31
32
@ConfigurationProperties ( prefix = "spring.cache.redis" )
@Configuration
public class RedisConfig {
private Duration timeToLive = Duration . ZERO ;
public void setTimeToLive ( Duration timeToLive ) {
this . timeToLive = timeToLive ;
}
@Bean
/**
* 该bean只针对cache存入到数据乱码问题
*/
public RedisCacheManager cacheManager ( RedisConnectionFactory factory ) {
RedisSerializer < String > redisSerializer = new StringRedisSerializer ();
Jackson2JsonRedisSerializer jackson2JsonRedisSerializer = new Jackson2JsonRedisSerializer ( Object . class );
//解决查询缓存转换异常的问题
ObjectMapper om = new ObjectMapper ();
om . setVisibility ( PropertyAccessor . ALL , JsonAutoDetect . Visibility . ANY );
om . enableDefaultTyping ( ObjectMapper . DefaultTyping . NON_FINAL );
jackson2JsonRedisSerializer . setObjectMapper ( om );
// 配置序列化(解决乱码的问题)
RedisCacheConfiguration config = RedisCacheConfiguration . defaultCacheConfig ()
. entryTtl ( timeToLive )
. serializeKeysWith ( RedisSerializationContext . SerializationPair . fromSerializer ( redisSerializer ))
. serializeValuesWith ( RedisSerializationContext . SerializationPair . fromSerializer ( jackson2JsonRedisSerializer ))
. disableCachingNullValues ();
RedisCacheManager cacheManager = RedisCacheManager . builder ( factory )
. cacheDefaults ( config )
. build ();
return cacheManager ;
}
}
service
1
2
3
4
5
6
7
8
9
10
11
12
13
14
15
16
17
18
19
20
21
22
23
24
25
26
27
28
29
30
31
32
@Service
@CacheConfig ( cacheNames = "c1" )
public class UserService {
@Autowired
private UserDao userDao ;
@Autowired
private RedisTemplate redisTemplate ;
@CachePut ( key = "#user.getId()" )
public User addUser ( User user ) {
return userDao . save ( user );
}
public User getUser ( Long id ) {
return userDao . findById ( id ). get ();
}
@Cacheable
public User getUserById ( Long id ) {
return userDao . findById ( id ). get ();
}
@CachePut ( key = "#user.id" )
public User update ( User user ) {
return userDao . save ( user );
}
@CacheEvict
public void deleteUserById ( Long id ) {
userDao . deleteById ( id );
}
}
springcache主要使用四个注解来操作数据@CacheConfig,@Cacheable,@CachePut,@CacheEvict。
springboot data rest几乎可以零配置,用restful风格实现对一个表简单的增删改查功能。
数据库配置
1
2
3
4
5
6
7
8
9
10
spring.datasource.type = com.alibaba.druid.pool.DruidDataSource
spring.datasource.username = root
spring.datasource.password = root
spring.datasource.url = jdbc:mysql:///test01
spring.datasource.driver-class-name = com.mysql.jdbc.Driver
spring.jpa.properties.hibernate.dialect = org.hibernate.dialect.MySQL57Dialect
spring.jpa.show-sql = true
spring.jpa.hibernate.ddl-auto = update
spring.jpa.database-platform = mysql
spring.jpa.database = mysql
实体类和dao
1
2
3
4
5
6
7
8
9
10
11
12
@Entity ( name = "t_book" )
public class Book {
@Id
@GeneratedValue ( strategy = GenerationType . IDENTITY )
private Long id ;
@Column ( name = "book_name" )
private String name ;
private String author ;
//省略 getter/setter
}
public interface BookRepository extends JpaRepository < Book , Long > {
}
自定义
1
2
3
4
5
6
7
8
9
10
11
// 自定义暴露路径
@RepositoryRestResource ( collectionResourceRel = "bs" , itemResourceRel = "b" , path = "bs" )
public interface BookRepository extends JpaRepository < Book , Long > {
// 自定义访问路径,rel 表示接口查询中,这个方法的 key;path 表示请求路径
@RestResource ( rel = "byauthor" , path = "byauthor" )
List < Book > findBookByAuthorContaining ( @Param ( "author" ) String author );
// exported 是否暴露,false为不暴露
@Override
@RestResource ( exported = false )
void deleteById ( Long aLong );
}
Spring Boot 打包成的可执行 jar ,为什么不能被其他项目依赖?可执行jar和普通jar包的区别?
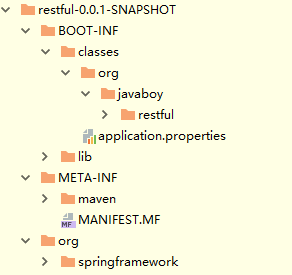
可执行jar 打包
repackage 命令,对第一步 打包成的 jar 进行再次打包,将之打成一个 可执行 jar ,通过将第一步打成的 jar 重命名为 *.original 文件
目录结构
MF-INF/MANIFEST.MF文件
1
2
3
4
5
6
7
8
9
10
Manifest-Version : 1.0
Implementation-Title : restful
Implementation-Version : 0.0.1-SNAPSHOT
Start-Class : org.javaboy.restful.RestfulApplication
Spring-Boot-Classes : BOOT-INF/classes/
Spring-Boot-Lib : BOOT-INF/lib/
Build-Jdk-Spec : 1.8
Spring-Boot-Version : 2.1.6.RELEASE
Created-By : Maven Archiver 3.4.0
Main-Class : org.springframework.boot.loader.JarLauncher
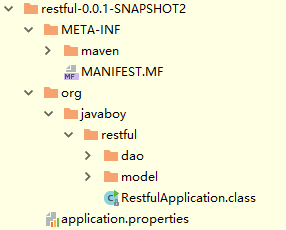
打包
首先 mvn package 命令 对项目进行打包,打成一个 jar,这个 jar 就是一个普通的 jar,可以被其他项目依赖,但是不可以被执行。
目录结构
MF-INF/MANIFEST.MF文件
1
2
3
4
5
6
Manifest-Version : 1.0
Implementation-Title : restful
Implementation-Version : 0.0.1-SNAPSHOT
Build-Jdk-Spec : 1.8
Created-By : Maven Archiver 3.4.0
# 没有启动类
生活中我们投递一封邮件要经过如下几个步骤:
深圳的小王先将邮件投递到深圳的邮局 深圳的邮局将邮件运送到上海的邮局 上海的小张来邮局取邮件 这是一个缩减版的生活中邮件发送过程。这三个步骤可以分别对应我们的邮件发送过程,假设从 aaa@qq.com 发送邮件到 111@163.com :
aaa@qq.com 先将邮件投递到腾讯的邮件服务器
腾讯的邮件服务器将我们的邮件投递到网易的邮件服务器
111@163.com 登录网易的邮件服务器查看邮件
打开邮箱的IMAP/SMTP/POP3等服务
application
1
2
3
4
5
6
7
8
9
spring.mail.host = smtp.163.com
spring.mail.port = 994
spring.mail.username = dengweiqiang66@163.com
spring.mail.password = 456213
spring.mail.default-encoding = UTF-8
spring.mail.properties.mail.smtp.socketFactoryClass = javax.net.ssl.SSLSocketFactory
spring.mail.properties.mail.debug = true
# 这个很重要,不然无法认证
spring.mail.properties.mail.smtp.ssl.enable = true
service
 1
 2
 3
 4
 5
 6
 7
 8
 9
10
11
12
13
14
15
16
17
18
19
20
21
22
23
24
//构建一个邮件对象
@Autowired
JavaMailSender javaMailSender ;
@Test
public void sendSimpleMail () {
// 构建一个邮件对象
SimpleMailMessage message = new SimpleMailMessage ();
// 设置邮件主题
message . setSubject ( "这是一封测试邮件" );
// 设置邮件发送者
message . setFrom ( "1510161612@qq.com" );
// 设置邮件接收者,可以有多个接收者
message . setTo ( "25xxxxx755@qq.com" );
// 设置邮件抄送人,可以有多个抄送人
message . setCc ( "37xxxxx37@qq.com" );
// 设置隐秘抄送人,可以有多个
message . setBcc ( "14xxxxx098@qq.com" );
// 设置邮件发送日期
message . setSentDate ( new Date ());
// 设置邮件的正文
message . setText ( "这是测试邮件的正文" );
// 发送邮件
javaMailSender . send ( message );
}